

How To Reduce Microsoft Word File Size
Shrink Microsoft Discussion File Size and Avoid Slowness, Corruption and Crashes
past Avantix Learning Team | Updated March 14, 2021
Applies to: Microsoft ® Word ® 2010, 2013, 2016, 2019 and 365 (Windows)
You can reduce the size of a Microsoft Give-and-take document in several means. The most mutual strategy to reduce Give-and-take file size is to compress pictures. However, you can as well use other methods to bargain with large documents such every bit saving media and Word files in other formats and limiting the use of specific features.
In this article, nosotros'll await at ten ways to reduce the size of a Word document:
- Compress pictures
- Insert pictures instead of copying and pasting
- Use smaller prototype files
- Utilize styles instead of manual formatting
- Save a copy of big Word files
- Change Autorecover settings
- Avoid or catechumen embedded objects
- Avoid embedded fonts
- Save a copy of the document in PDF format
- Relieve a copy of the certificate in RTF format
Note: Buttons and Ribbon tabs may brandish in a different mode (with or without text) depending on your version of Discussion, the size of your screen and your Control Panel settings. For Word 365 users, Ribbon tabs may appear with different names. For instance, the Picture Tools Format tab may appear every bit Pic Format.
Recommended commodity: How to Hibernate Comments in Word (or Brandish Them)
Do you want to acquire more than about Microsoft Word? Bank check out our virtual classroom or live classroom Word courses >
To view file size of a Word certificate:
- Click the File tab in the Ribbon.
- Click Info. In the Properties area, file size is listed beside Size.
For some of the following strategies, you will need to close and save the file so bank check file size once more to see a difference in file size.
1. Compress pictures
Ideally, if you use modest sizes when you insert pictures, this will reduce the size of your Discussion documents. Withal, you can compress i or all pictures in a Word file. Y'all may wish to attempt this with i picture at a fourth dimension to be certain yous are satisfied with the result afterward compression.
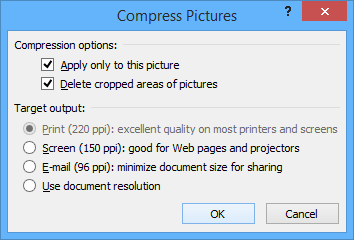
To compress a movie or pictures:
- Click a flick.
- Click the Picture Tools Format or Motion picture Format tab in the Ribbon.
- Click Shrink Pictures in the Conform group. A dialog box appears.
- Select the option to employ merely to the current picture or uncheck the pick to use to all pictures.
- Select the option to delete cropped areas of pictures if desired.
- Choose a document resolution.
- Click OK.
2. Insert pictures instead of copying and pasting
It's better to insert pictures using the Insert tab in the Ribbon, rather than copying and pasting from another file. When you copy and paste, the paradigm can lose compression, alter file type and also bring in other data that can increase file size.
To insert a picture show in Microsoft Word:
- Click the Insert tab and click Picture(south). A dialog box appears.
- Navigate to the location of the motion picture.
- Click the moving picture and click Insert or double-click the picture.
You also accept the option of linking to a picture file by clicking the arrow abreast Insert in the Insert Motion picture dialog box and then choosing Link to File. However, the motion-picture show is not actually "in" the file (which reduces file size) so if you email the document, pictures will not be included.
3. Use smaller image files
It'due south best to insert pictures in smaller sizes to reduce the size of your Word files. For case, if y'all are inserting pictures from a phone taken at a high resolution, this will event in larger documents. Create, save or ship images at a lower resolution and insert the lower resolution images into your documents.
If you're using stock images, select images at the everyman resolution (at the quality level you crave). Yous can also open an image in an image editing program (such as Microsoft Picture Manager or Adobe Photoshop) and and so salve it at a lower resolution.
In Give-and-take 365, i of the biggest culprits causing inflated file size is 3D models. Although 3D models are not inserted as pictures but rather equally 3D models, they are images. You can't compress 3D models similar other types of images so you may need to delete 3D models or use a movie instead of a 3D model if file size is an issue.
four. Utilise styles instead of transmission formatting
The more transmission or straight formatting you apply in a Give-and-take certificate, the larger it will become. This becomes problematic with very big documents. Employ styles as much every bit possible to reduce file size and automate formatting. Instead of applying xiv indicate, bold, and blue to a heading, consider using a style instead.
To apply a style:
- Select the content to which y'all wish to employ a style (such as a heading).
- Click a way in the styles group on the Home tab in the Ribbon.
To modify a style:
- Right-click the style in the Styles group on the Home tab in the Ribbon and cull Modify.
- Make the necessary changes.
- Click OK.
5. Save a re-create of big Discussion documents
It's non a bad idea to save a re-create of a big Word document periodically using Save Equally. If y'all salvage a copy using Save Equally, version history and some editing data is removed during the procedure.
To save a copy of a Discussion file:
- Click the File tab in the Ribbon.
- Choose Salvage As. If necessary, click Options or More than Options. A dialog box appears.
- Navigate to the desired location and proper noun the file with a different name (such equally MarketingPlan2).
- Click Save.
Consider saving a copy of large files regularly and include a date in the name of the file (such as Marketing-Plan-May-seven-2020). This tin can also help avert decadent documents.
Another recommendation is to utilise the Review tab in the Ribbon to accept or decline tracked changes and so turn off tracked changes. This tin be done either before making the copy or in the copy. Extensive use of tracked changes can wearisome down a big document and increase file size.
6. Modify AutoRecover settings
Yous can turn off AutoRecover entirely (not recommended) or modify the time when Word creates an autorecover file. Discussion volition no longer recover your Word files if you have a crash if you turn off AutoRecover completely so use this technique only if you are very comfortable with this setting.
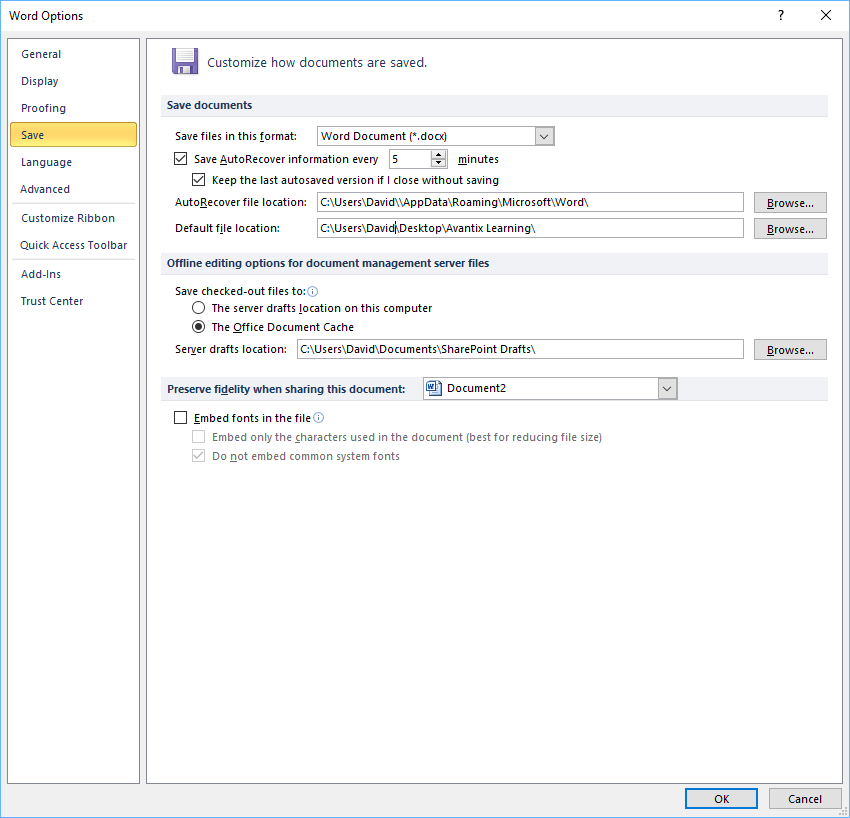
To change the AutoRecover save time to a longer time (such as 20 minutes):
- Click the File tab in the Ribbon.
- Click Options.
- In the categories on the left, click Salvage.
- In the Save Autorecover information every v minutes, change the time.
- Click OK.
Save Autorecover options announced in the Word Options dialog box:

To plough off AutoRecover (non recommended):
- Click the File tab in the Ribbon.
- Click Options.
- In the categories on the left, click Save.
- Uncheck Salve AutoRecover information every 5 minutes.
- Click OK.
On another note, if AutoRecover is turned on and you lot get out your Discussion file open up when you leave your calculator, the file continues to increment in size as Word creates new versions of the file. Consider endmost the file when you're not working on information technology.
seven. Avert or catechumen embedded objects
If you embed objects (such as an Excel worksheet) in your Word documents, this will increase the size of your files. Try to avoid embedding if you lot need to reduce file size or convert embedded objects to pictures.
To catechumen an embedded object to a picture, select it and then press Ctrl + Shift + F9. To convert all embedded objects to pictures, printing Ctrl + A to select all and then printing Ctrl + Shift + F9. Some users may demand to press Fn besides to enable their part keys. For more information well-nigh inserting Excel data into a Word document, check out 3 Ways to Copy Excel Data into Word.
viii. Avoid embedded fonts
Another reason Word files may go very large is because of font embedding. Users may embed fonts if they are using a not-standard font and plan to open up the file on a device that does not have the font installed. If using non-standard fonts, it'south ordinarily better to install the font on the other device rather than embedding (which can exist buggy).
To plow off font embedding:
- Click the File tab in the Ribbon.
- Click Options.
- In the categories on the left, click Save.
- Ensure Embed fonts in this file is unchecked and click OK.
Embed fonts appears in Discussion Options in the Save category:
ix. Save a copy of a document in PDF format
It's a mutual practice to save Discussion files in PDF (Portable Document Format) for portability and to reduce the size of the file. PDF documents tin exist shared with colleague when the Discussion file is as well large.
To save a re-create of a Word document in PDF format (and shrink pictures):
- Click the File tab in the Ribbon.
- Cull Save As and then click Options or More Options if necessary. A dialog box appears.
- Navigate to the desired location and enter a name for the file. You can use the same name since the extension will be unlike (PDF).
- Nether File Type, select PDF.
- Click Tools on the bottom right of the dialog box. A drop-down carte du jour appears.
- Select Compress Pictures. A dialog box appears.
- Click the desired compression pick.
- Click OK.
- Click Save.
ten. Save a copy of a certificate in RTF format
Another technique you lot tin can try if a Word file seems to be too big or slow is to salve the file every bit an RTF (Rich Text Format) file, reopen it and salve it again in Discussion format.
To save a re-create of a Word document as an RTF file:
- Click the File tab in the Ribbon.
- Choose Salvage As and and then click Options or More Options if necessary. A dialog box appears.
- Select RTF as the file blazon.
- Navigate to the desired folder and enter a name.
- Click Relieve.
- Close the file.
- Click the File tab and choose Open.
- Double-click the RTF file.
- Click the File tab and cull Save As.
- Navigate to the desired folder.
- Select file type for Microsoft Discussion certificate (.docx).
- Enter a new file proper noun.
- Click Save.
Other issues
Other features that may cause problems include a large number of cartoon objects, inserting cross-references and grouping captions with images and so you may want to avert or limit the use of these features. It'due south also a good thought to save older files in .doc format to the new .docx format.
Subscribe to get more articles like this ane
Did you lot find this article helpful? If y'all would similar to receive new articles, bring together our electronic mail list.
More resources
How to Double Space in Give-and-take (four Ways + Shortcut)
How to Detect and Replace in Word (and Utilize Wildcards)
How to Create a Hanging or First Line Indent in Give-and-take (iii Ways)
How to Insert an Em or En Dash in Word (four Means with Shortcuts)
How to Automatically Insert Reusable Text Snippets in Discussion Using Quick Parts
Related courses
Microsoft Word: Intermediate / Advanced
Microsoft Word: Designing Dynamic Word Documents Using Fields
Microsoft Word: Long Documents Master Class
Microsoft Word: Attainable Discussion Documents
Microsoft PowerPoint: Intermediate / Advanced
VIEW More COURSES >
Our instructor-led courses are delivered in virtual classroom format or at our downtown Toronto location at one Yonge Street, Suite 1801 (Toronto Star Building), Toronto, Ontario, Canada (some in-person classroom courses may also be delivered at an alternating downtown Toronto location). Contact united states of america at info@avantixlearning.ca if you'd like to suit custom onsite training or an online form on a date that'south convenient for you.
Copyright 2022 Avantix ® Learning
Microsoft, the Microsoft logo, Microsoft Office and related Microsoft applications and logos are registered trademarks of Microsoft Corporation in Canada, U.s.a. and other countries. All other trademarks are the belongings of the registered owners.
Avantix Learning | 1 Yonge Street, Suite 1801 (Toronto Star Edifice), Toronto, Ontario, Canada M5E 1W7 | info@avantixlearning.ca

How To Reduce Microsoft Word File Size,
Source: https://www.avantixlearning.ca/microsoft-word/reduce-file-size-large-word-documents-avoid-bloat-slowness-corruption-crashes/
Posted by: velozbeted1955.blogspot.com
0 Response to "How To Reduce Microsoft Word File Size"
Post a Comment